How to create a directory website
A LocusPilot directory is a local business directory built around two layers: the listing data (every business in your niche and city, with hours, photos, and reviews) and the analysis on top of it.
AI reads the recent reviews and writes the sentiment summaries, every ranking runs on a published scoring methodology, and the site launches with editorial pages like best-of lists and comparisons rather than a bare listings dump.
This guide walks the whole path: what to decide before you start, the six wizard steps, what the build does, and what to do once the site is live. If you only want the naming and publisher-identity half, that lives in How to brand your directory.
1Before you open the wizard
You need three decisions made, and none of them require research tools.
Pick a niche
Any Google Maps business category works: dentist, hvac contractor, mexican restaurant, pet groomer. Specific beats broad. “Dentist in Austin” gives the engine a clear scoring rubric; “businesses in Austin” is not a directory.
Pick a city
One city is the simplest start. The wizard also takes up to five cities if you want one regional directory across a metro area, but you can always build the neighbouring city as its own directory later.
Have a domain in mind, not in hand
The wizard never asks for a domain. Your site launches on a free pages.dev address and you connect the real domain afterwards from the dashboard. Still, deciding the domain early helps because the best directory names follow the domain: brooklyncafe.com becomes “Brooklyn Cafe Guide”. The branding guide covers this pattern in detail.
Know the price
A build is 5 credits flat plus 0.1 credits per listing, and you are charged for the exact number of businesses found, not the cap you set. A 100-listing directory is 15 credits to build and 5 credits per refresh cycle. You see the exact number in the wizard before anything is charged.
2Step 1: pick your niche
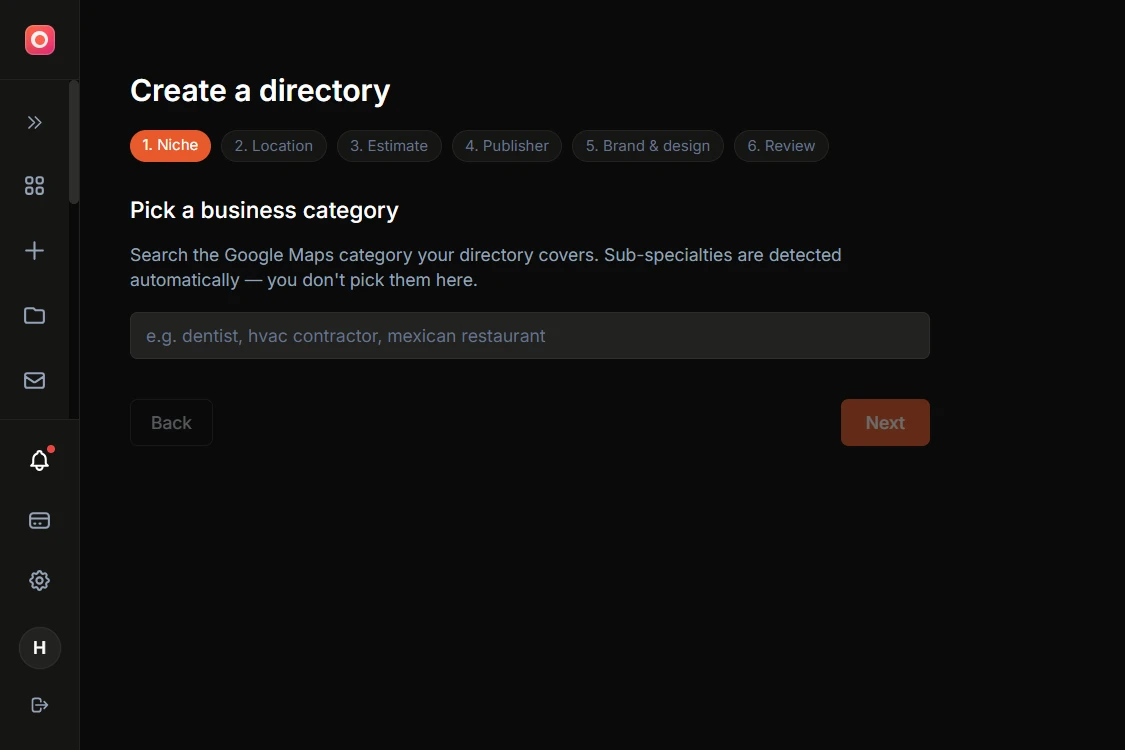
Start typing a business category and pick from the suggestions. The list is the Google Maps category set, so anything a business can register as on Google Maps can become a directory: from “acupuncturist” to “wedding venue”.
Two things you do not pick here:
Sub-specialties
If you choose “dentist”, the engine detects orthodontists, pediatric dentists, and cosmetic clinics on its own from the scraped data. You get to choose which of them become category pages at step 3.
A category taxonomy
There is no tree to climb. One search box, one pick.
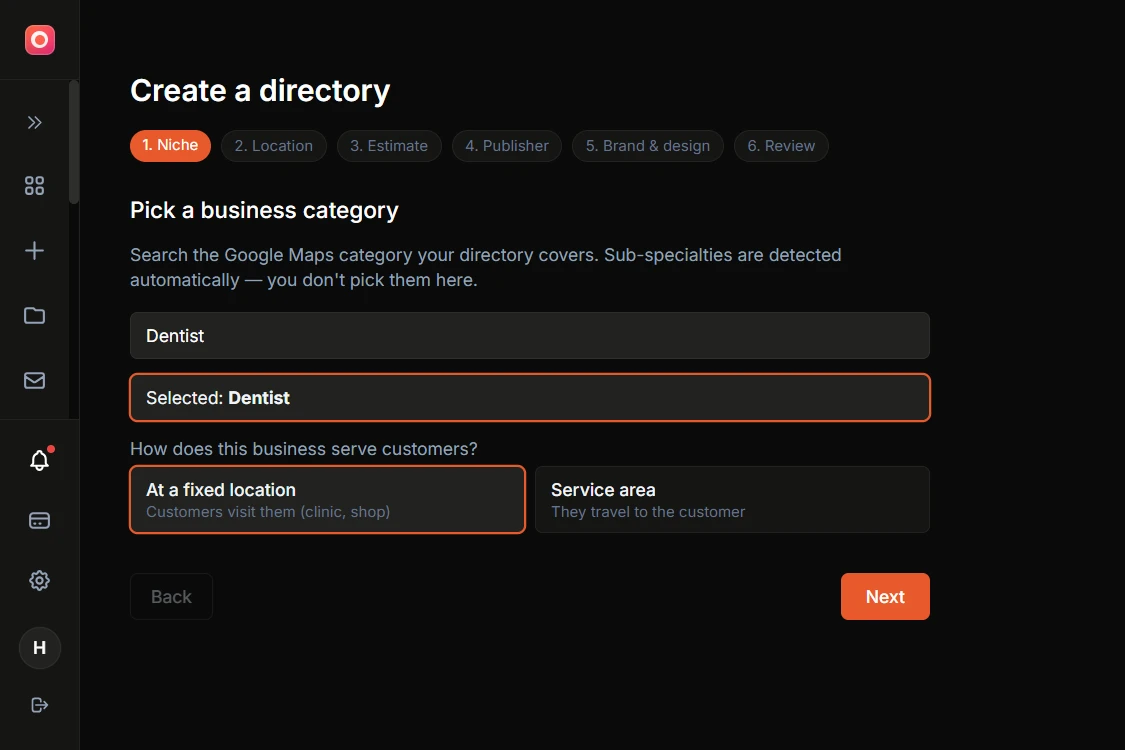
After you pick, the wizard asks how these businesses serve customers: at a fixed location (customers visit them: clinics, restaurants, salons) or as a service area (they travel to the customer: plumbers, cleaners, movers). It pre-selects the likely answer from the category; change it if it guessed wrong.
The answer shapes how the directory handles locations, so it is worth a second of thought: service-area directories get pages for the cities the businesses actually cover, not just their office addresses.
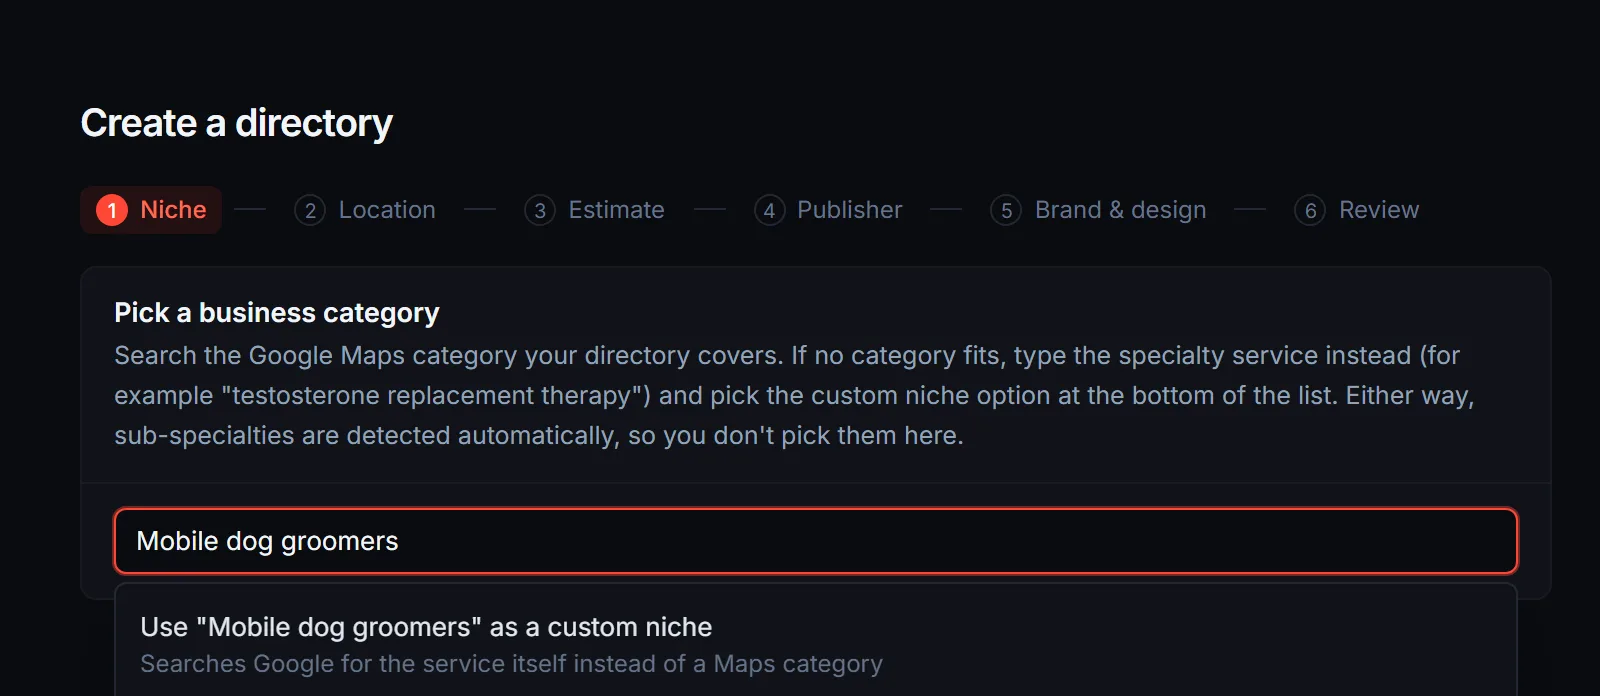
No Maps category fits? Type the service itself and pick the custom niche option at the bottom of the list. The scan then searches Google for that service instead of a Maps category.
3Step 2: choose the location
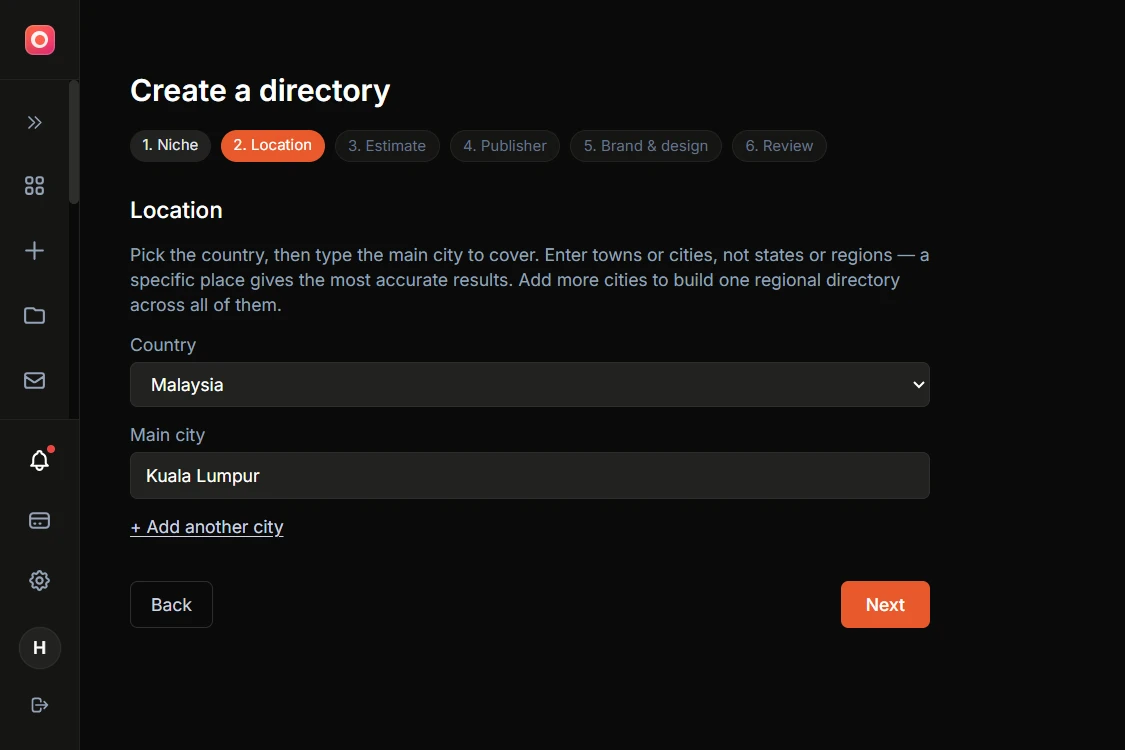
Pick the country, then type the main city. Enter towns or cities, not states or regions; a specific place gives the most accurate scan.
Adding more cities
“Add another city” takes up to five places total and builds one regional directory covering all of them. When you enter two or more, a region name field appears (e.g. “Greater Austin” or “Klang Valley”).
Fill it in: it names the broader area your homepage targets, and each city gets its own page beneath it. Leave it blank and the main city doubles as the region, sharing the homepage instead of getting its own page.
The quick-check note
If the wizard says it could not auto-confirm a place, read it as a country check, not an error. The lookup list only covers larger cities, so small towns and custom areas resolve as unknown all the time and build fine. The one real mistake it catches is a place in the wrong country, like “Toronto” with United States selected.
4Step 3: the live estimate
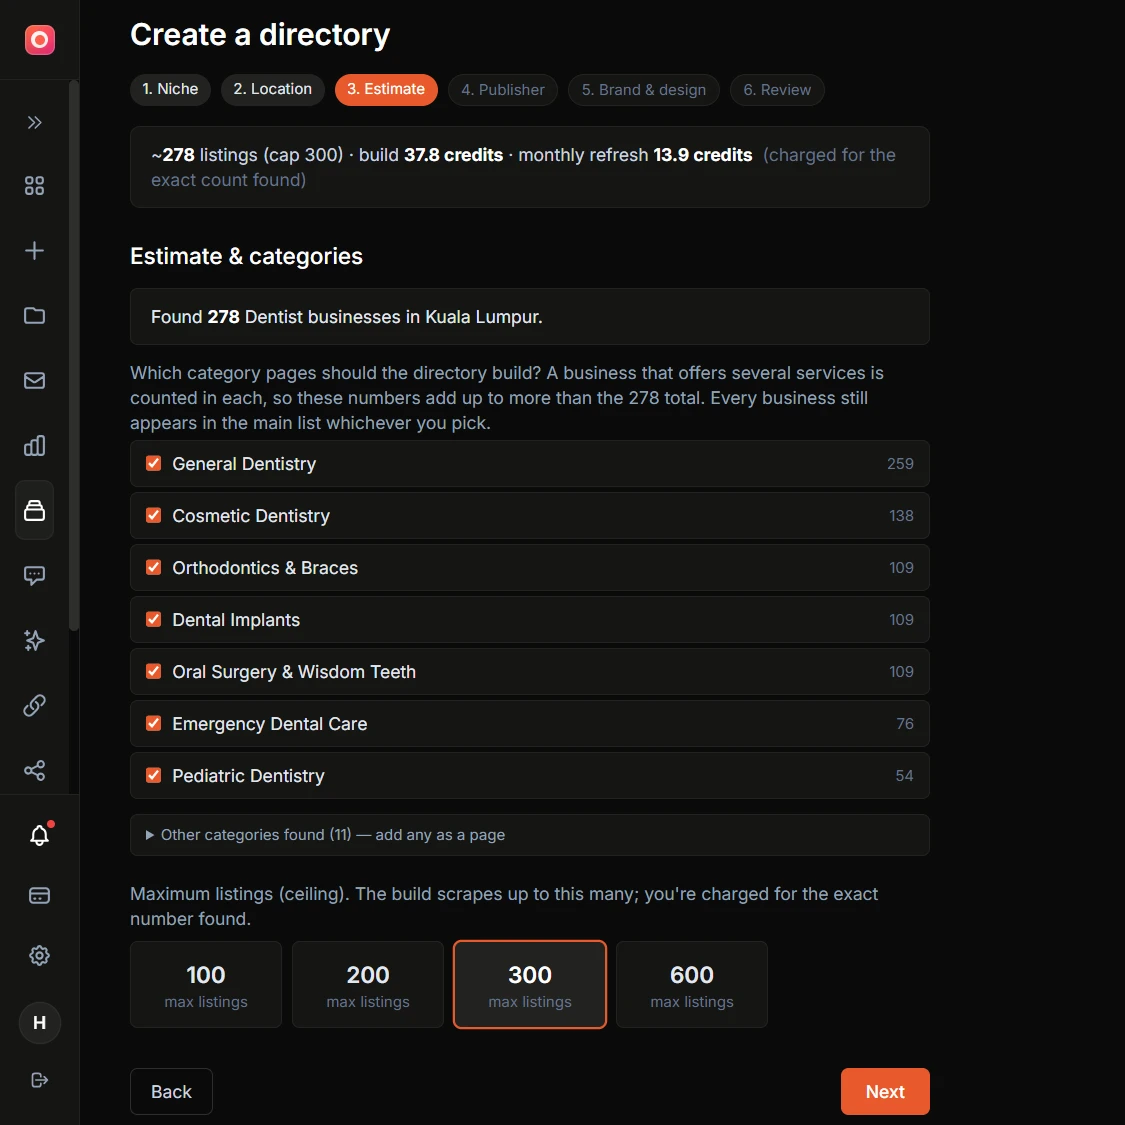
The moment you reach this step, the wizard scans your area for businesses in the category. It takes a minute or two and comes back with a real count: “Found 371 dentist businesses in Austin.” From here on, a cost bar at the top of the wizard shows exactly what the build and each refresh will cost.
Three decisions on this screen:
- 1Category pages.
The scan surfaces the sub-specialties it found, each with a business count, all selected by default. Untick any you do not want as a dedicated page.
Two things to know: a business offering several services is counted in each category, so the numbers add up to more than the total; and every business stays in the main listing whichever pages you pick.
There is also a collapsed “other categories found” list for long-tail specialties you can add as pages.
- 2The listing cap.
Pick a maximum: 100, 200, 300, or 600 listings. This is a ceiling, not a target. The build scrapes up to the cap and charges you for the exact number found. If the scan found 371 businesses and you set the cap at 600, you pay for roughly 371, not 600.
- 3The price you are agreeing to.
The formula is 5 credits flat plus 0.1 credits per listing to build, then 0.05 credits per listing per refresh cycle. So a 100-listing directory is 15 credits to build and 5 credits per refresh; a 300-listing one is 35 and 15.
If a first-build discount applies to your account, the cost bar shows the standard price struck through with the discounted price next to it and a label saying why.
If the estimate fails, you can still continue: set a cap and build, and the sub-specialties are detected during the build instead. There is also a retry link. And if you already have a directory with this category and location, the wizard warns you but does not block a second one.
5Step 4: publisher and trust
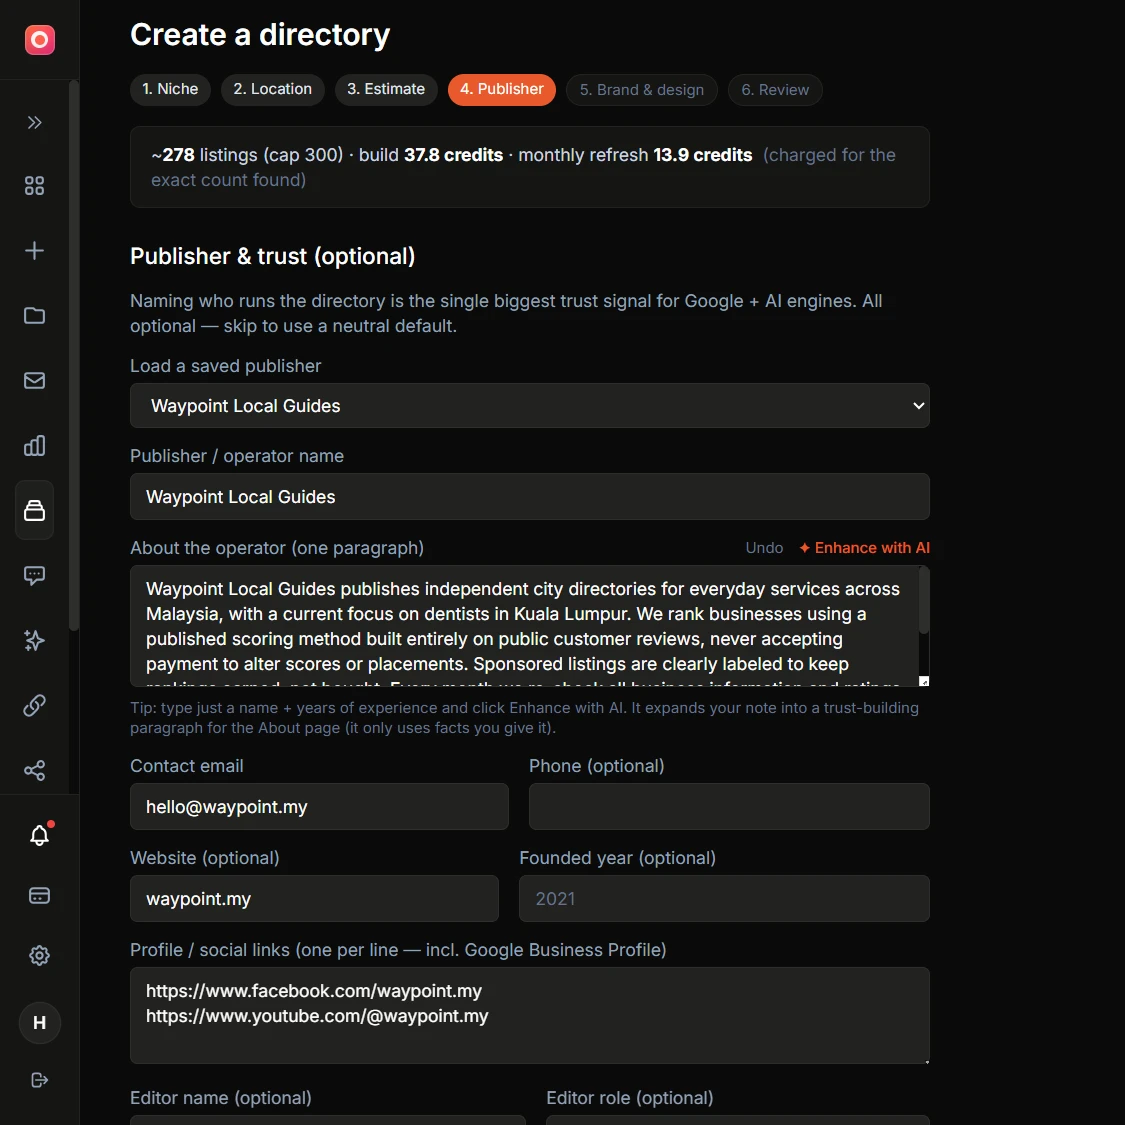
Every field on this step is optional, and this is the step most worth not skipping. The publisher answers “who is behind this site?”, the question Google’s quality systems, AI assistants, and every business owner you email will ask. Skip it and the site falls back to a neutral default.
Built a directory before? If you have saved a publisher, a “Load a saved publisher” dropdown sits at the top of this step. Pick one and every field below fills in from it, so you never retype the same operator details for each build.
Your saved publishers live on the Publishers page, and the branding guide covers why running one publisher across every directory matters.
Publisher name and about the operator
Write two facts (“Sarah Miller, 12 years running dental marketing in Austin”) and click Enhance with AI: it expands your note into a full About-page paragraph using only the facts you gave it. Undo is one click if you prefer your original.
Contact email, phone, website, founded year
A real inbox matters most; correction requests from listed businesses land there.
Profile and social links
One per line, including your Google Business Profile if you have one.
Editor name and role
The person who signs the editorial content.
Refresh cadence
Monthly or weekly. Monthly is the default and right for most niches.
A disclosure checkbox
Tick it if you plan to sell featured placement. It keeps the site’s trust pages honest about it from day one.
When you are done, Save publisher for reuse stores everything on this step as a profile you can load into your next directory in one click. Loading a profile copies its values in; editing the saved profile later never touches a directory you already built, so each site keeps its own snapshot.
Choosing what to put in these fields (your company name or a separate publisher brand, what the about paragraph should say, how the one-name rule works) is the subject of the branding guide, sections 3 to 5. If you have not read it, do this step with it open.
6Step 5: brand and design
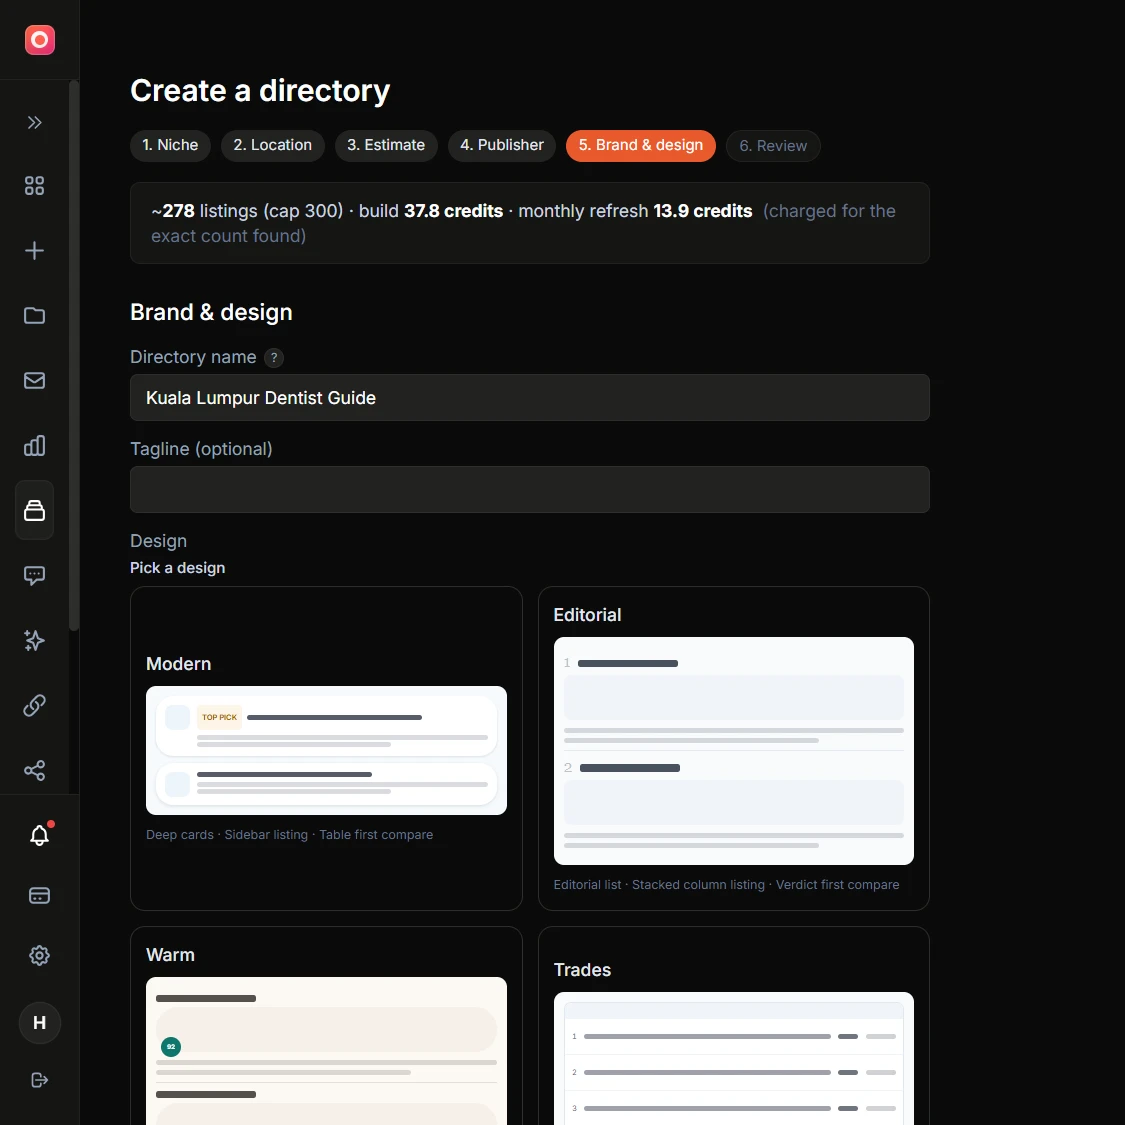
The name. The field arrives prefilled in the shape “Austin Dentist Guide”: your place, your niche, and a qualifier word.
That is the pattern that works, and the tooltip next to the field explains why: it tells Google and AI assistants this is a ranking site rather than one business, it avoids clashing with a real business named after the keyword, and it makes searches for your brand measurable.
If you type a name without a qualifier word, the wizard shows a gentle hint but never blocks you. You can rename the directory later from Settings, but the name feeds your page titles, structured data, and branding from day one, so it is worth the extra minute now; the branding guide has the full reasoning.
Tagline is optional. What + where + why trust it: “Every dentist in Austin, scored from real reviews and re-verified monthly.”
Design. A preset is pre-selected to fit your niche (a salon directory and a plumbing directory should not look alike). Keep it, pick another, or open the design studio and adjust individual pieces. Every design choice is editable after launch, so do not stall here.
Logo, logo on dark, favicon. Upload what you have. The “logo on dark” slot is a light variant for the transparent header that floats over the homepage hero photo; add one if your main logo is dark, otherwise the main logo is used.
WhatsApp buttons. A toggle controls whether business cards show a WhatsApp contact button. The default follows your country: on in markets where WhatsApp is a primary business channel, off where it is not. Call buttons always show either way.
Content policy. These controls set what the site says about the businesses it lists.
Negative remarks has three settings. Soften is the default: it weights the newest reviews, stops repeating complaints that newer reviews have answered, and keeps at most two watch-outs per listing. Show as written keeps every watch-out and complaint theme the reviews support.
Hide removes them, and also removes head-to-head comparison pages unless you untick that sub-option, since a comparison verdict is critical of one side by nature.
Below that sit five checkboxes:
- Hide staff and owner names
- Hide phone numbers (this also removes the Call and WhatsApp buttons on best-of and homepage picks, so enquiries come through your lead form)
- Hide website links
- Hide the category ranking line
- Avoid health, finance and legal claims
The first four start off. The claims box ticks itself when the niche is a regulated one (a dentist or a mortgage broker, say), and you can untick it.
Turn the hide switches on if your market calls for it: privacy rules around naming people, or a plan to sell placements to the listed businesses where a public complaints list makes the pitch harder.
Scores and rankings are never affected, the full review analysis is always captured, and you can change any of these later from Settings with a free publish. The manage guide covers the details, including per-listing permission to show names.
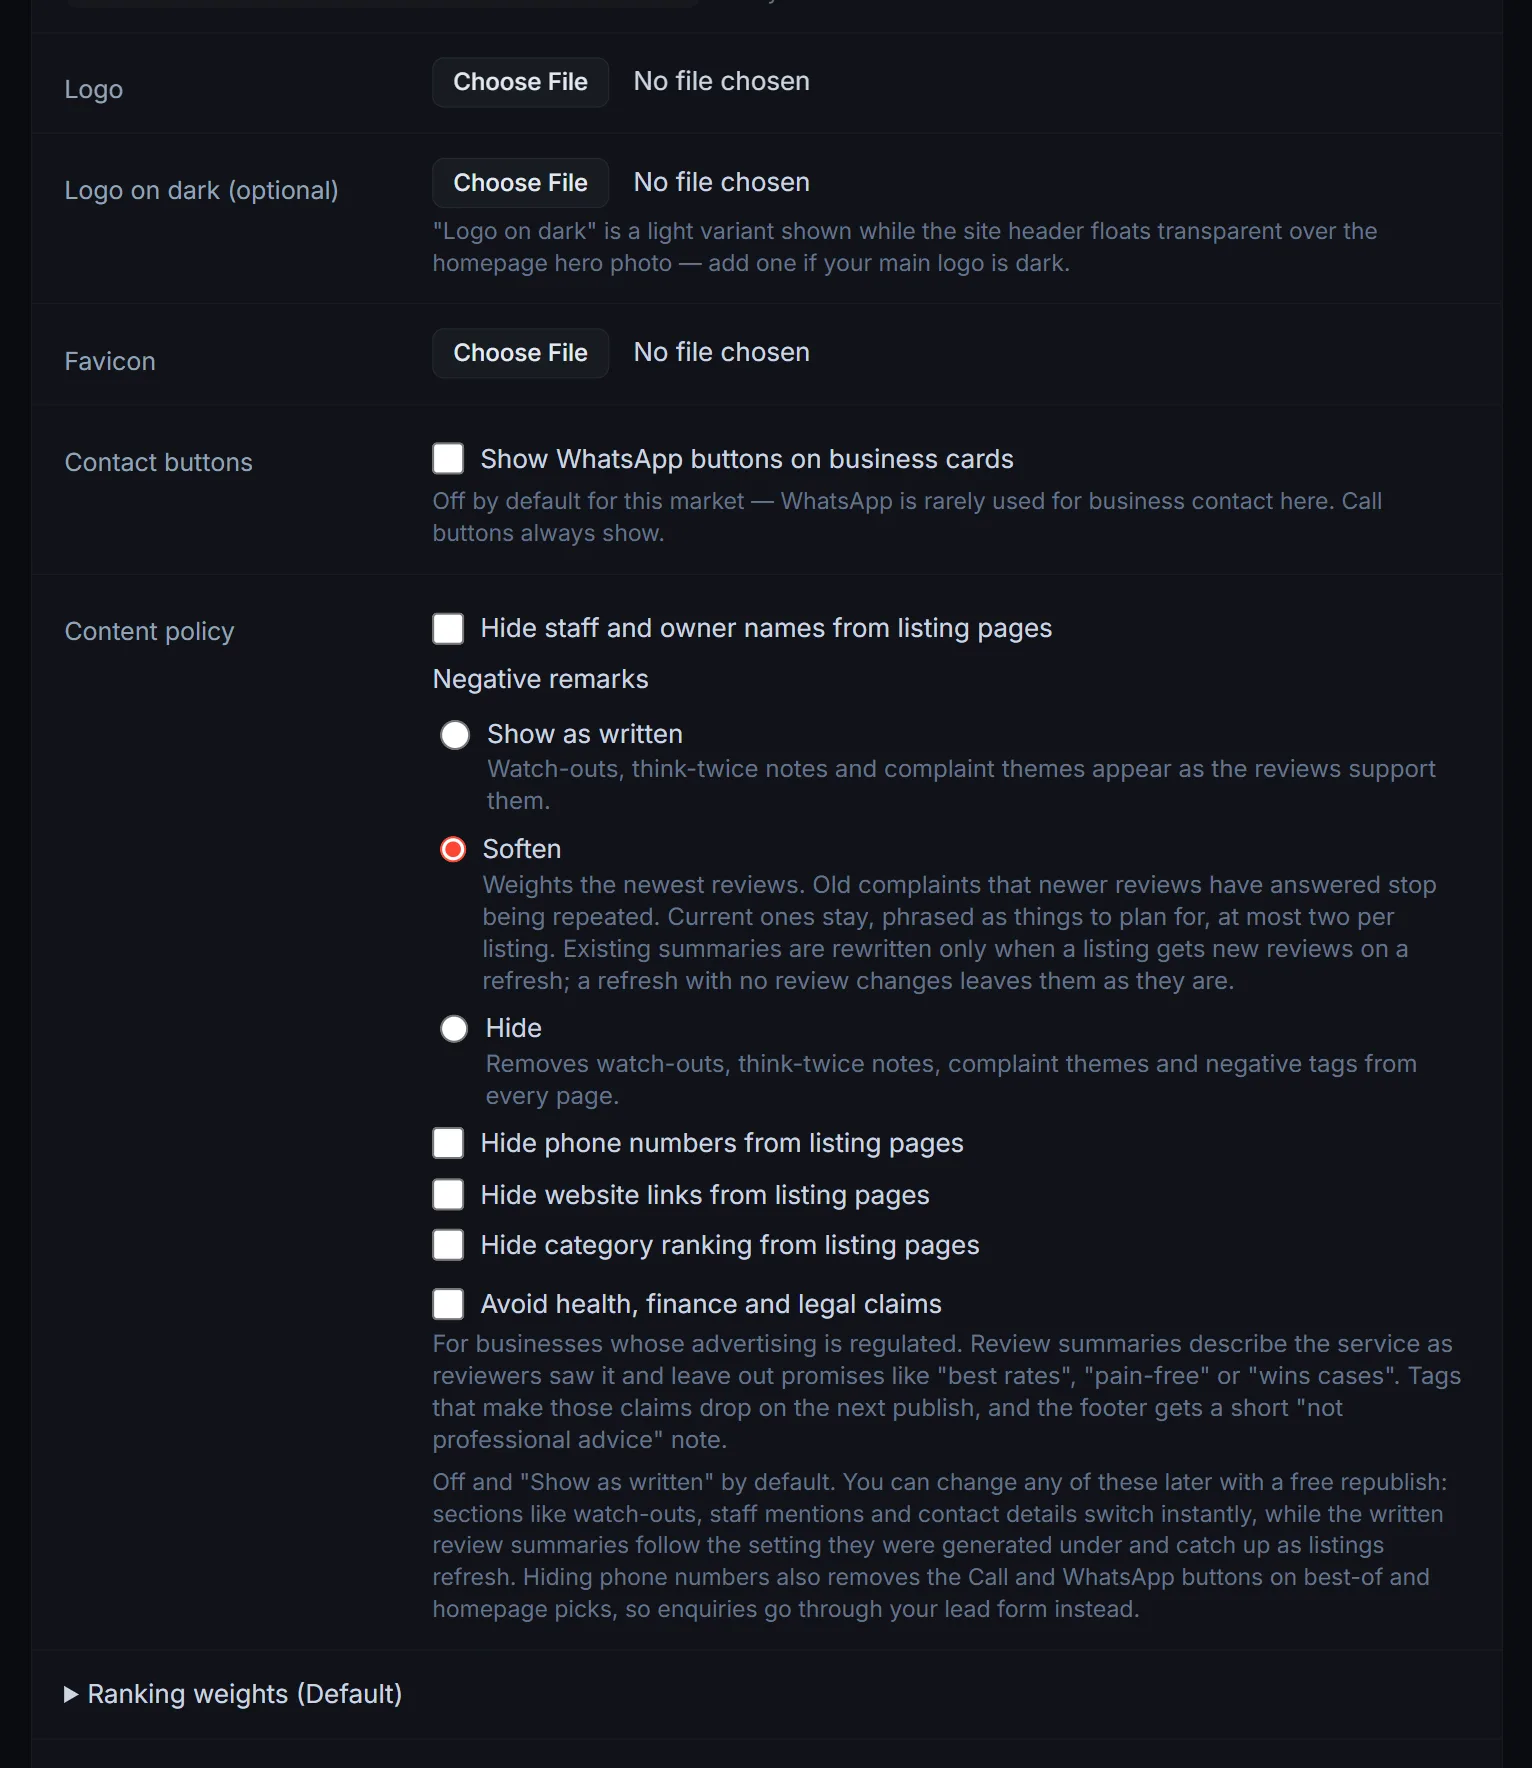
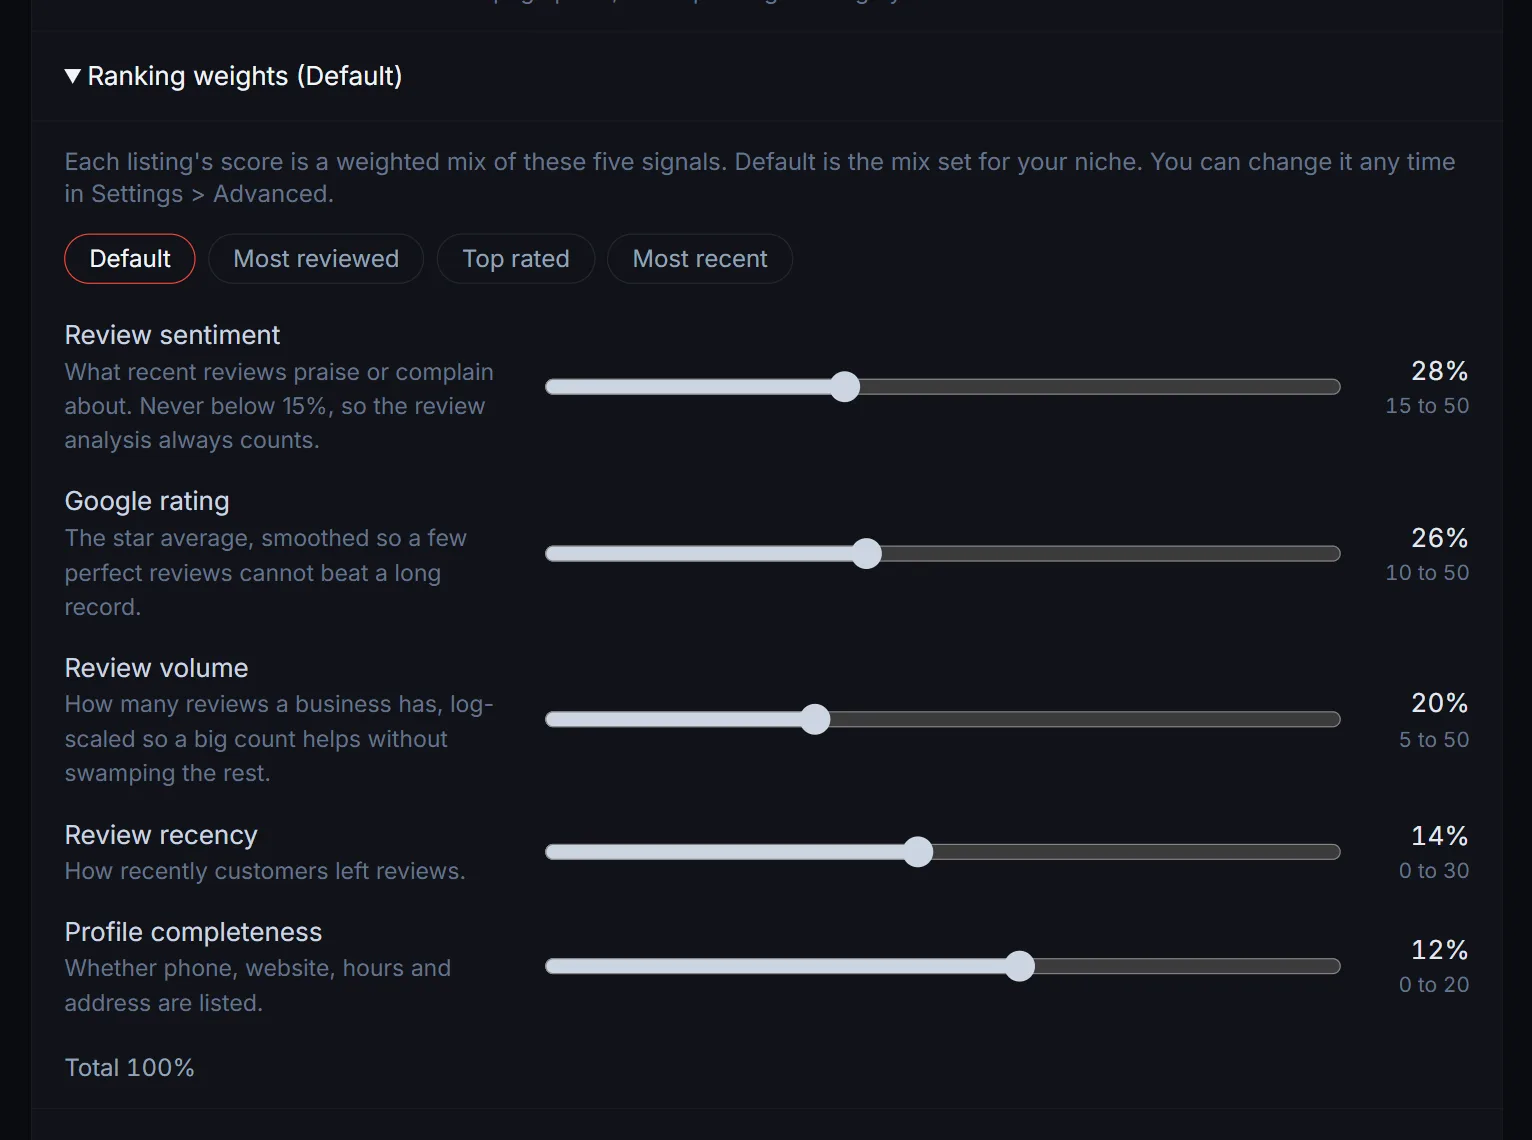
Ranking weights sit in a collapsed panel set to Default, which is your niche's own mix with review sentiment leading. Open it to change how much review sentiment, Google rating, review volume, recency and profile completeness count toward each score, with sliders or a preset such as Most reviewed.
The panel fills in once the Estimate step has finished. Leave it on Default if you are not sure: you can change the weights later from Settings and apply them for free; the manage guide explains how.
Analytics and custom scripts live in a collapsed panel: GTM container, GA4 measurement ID, a Google Search Console verification token, and free-form head or body scripts. All optional, all editable later.
You will notice there is no domain field. The site launches on its own pages.dev address; you connect the real domain from the dashboard settings after the first build.
7Step 6: review and confirm
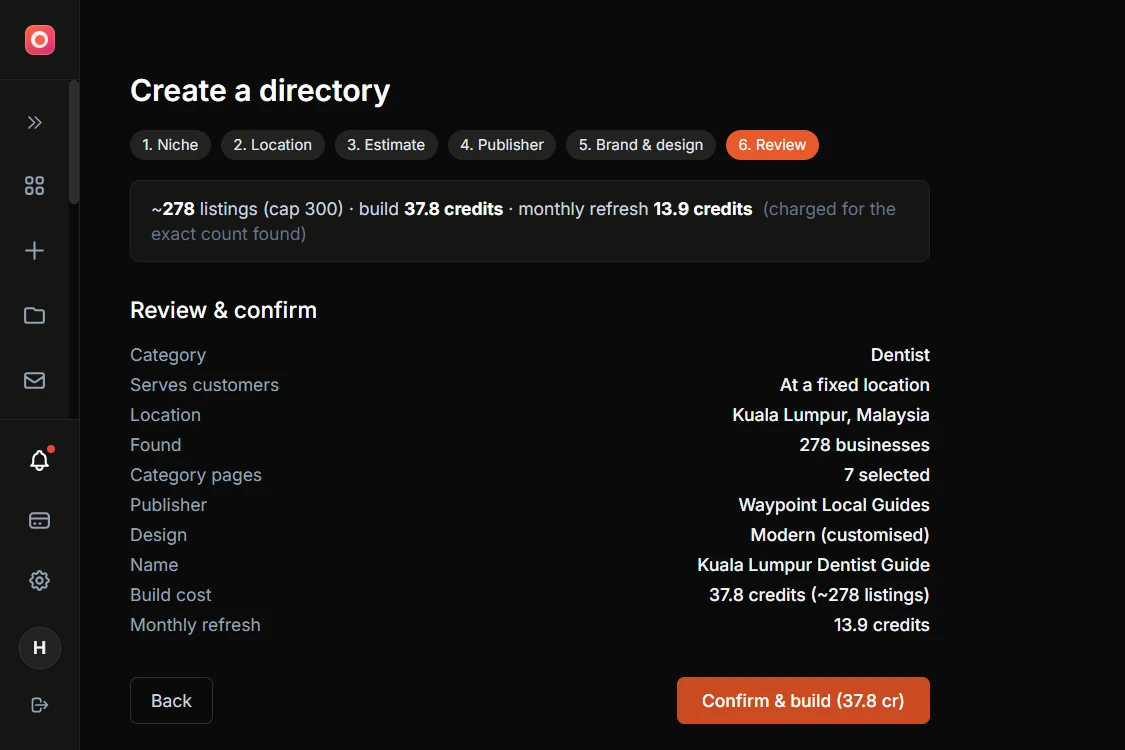
One screen with everything you chose: category, how the businesses serve customers, location, the business count found, how many category pages you selected, publisher, design preset, name, and the two numbers that matter: the exact build cost and the per-refresh cost. The confirm button repeats the charge, so there is no surprise on the invoice.
Click Confirm & build and the wizard hands off to the build.
You can walk away mid-wizard. Every time you hit Next, the wizard saves a draft. Close the tab, come back tomorrow, and it restores everything: category, cities, publisher fields, uploads, even your design tweaks. Nothing is charged until you confirm on step 6.
8What happens during the build
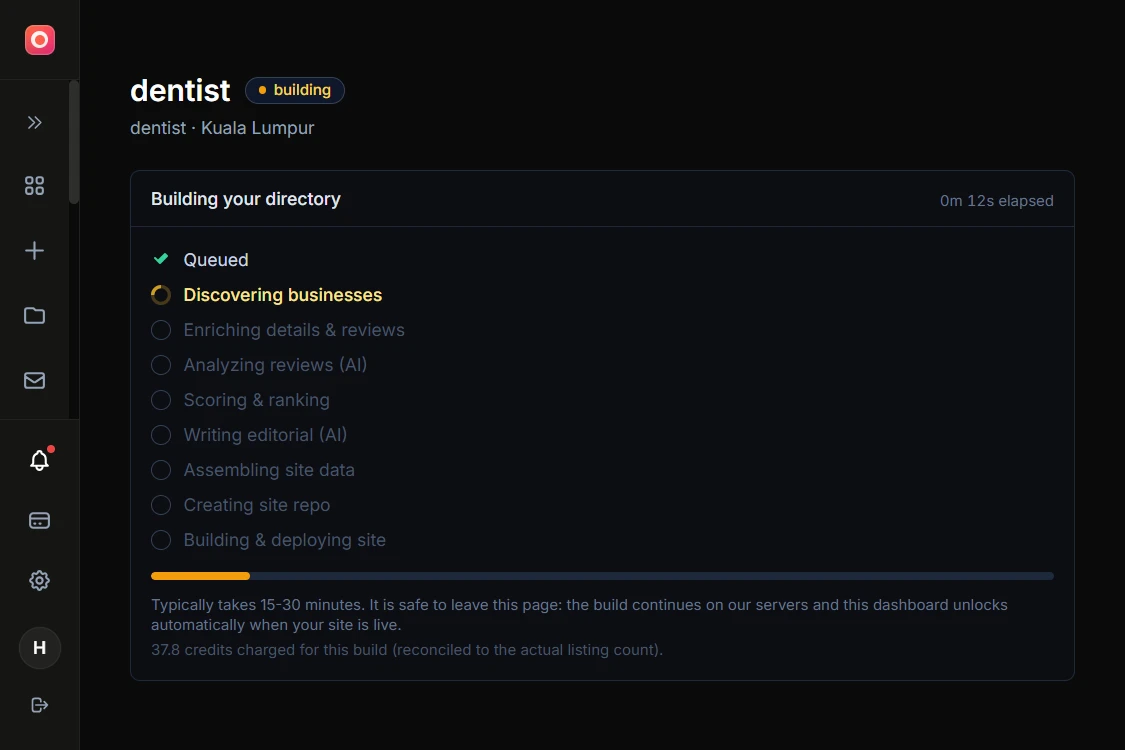
The build runs on our servers and shows its progress live. The stages, in order:
- 1Discovering businesses
Every business in your area and category, up to your cap.
- 2Enriching details and reviews
Hours, photos, websites, and the recent reviews for each business.
- 3Analyzing reviews with AI
Sentiment summaries, praise themes, complaints, and “best for” callouts per listing.
- 4Scoring and ranking
Every business scored on the published methodology.
- 5Writing editorial with AI
Best-of pages, comparisons, category and area intros.
- 6Assembling and deploying
Site data assembled, the site repo created, and the site built and deployed.
What happens behind the scenes:
- ✓ Pages that would be thin are never built: depth floors gate every category hub, best-of, and listing page
- ✓ Every page ships with structured data, and the site carries an llms.txt file so AI assistants know what it covers and who publishes it
- ✓ You are charged for the exact listing count found; if the estimate billed more than the build found, the difference is refunded
- ✓ If the build fails at an engine stage, the credits are refunded automatically
Timing: typically 15 to 30 minutes. It is safe to close the page; the build continues on our servers and the dashboard unlocks when the site is live.
The finished site deploys to its own pages.dev address, e.g. austin-dentist-guide.pages.dev. Search engines are deliberately blocked on that address: your directory should get indexed on your real domain, never on a preview URL. Which brings us to the last part.
9After the build
Read your own site first
Open the pages.dev preview and click around: the homepage, a few listing pages with their review-sentiment summaries, a best-of page, the methodology page. This is the fastest way to catch anything you want to reword, and every page’s content and SEO fields are editable from the dashboard.
One expectation to set: the buyer-guide library is written on the refresh cycle after deploy, not on day one, so a brand-new directory not showing guides yet is normal.
Connect your domain
In the directory dashboard, open Settings; the custom domain panel unlocks after the first build. Add the domain, set the two CNAME records at your registrar (we connect the www and non-www versions for you, so both addresses serve), and once it verifies the site republishes as indexable automatically.
Until then it stays invisible to search engines by design. The DNS mechanics are the same as for any LocusPilot site; the custom domain guide has per-registrar instructions.
Check the leads panel
Every listing page and quote form feeds enquiries into your directory dashboard’s Leads & CTA panel and your LocusPilot leads inbox, tagged with the page they came from. Nothing to wire up; just know where to look.
The alert email goes to the publisher contact email you entered (or your account email if you left it blank), and you can change the recipient any time under Portfolio → Sites, where every directory is listed automatically without using up your plan’s site allowance.
Let the refresh work
On your cadence (monthly by default), the directory re-scans: closed businesses drop out, new ones enter, review sentiment is re-analyzed where reviews changed, and every page gets a real updated date.
Listings carry a “last verified” date and the site publishes a freshness page showing the last full re-verification. Each cycle costs 0.05 credits per listing, and your edits survive it.
Everything you do to a directory after launch lives in its dashboard: refreshing data, editing pages, featuring a listing, connecting the domain, reading leads. The manage your directory guide walks through every tab.
Wondering what the subscription covers after launch, or whether you can export the site to your own hosting? Directory hosting, refresh and export answers both.
Frequently asked questions
What does a directory cost, exactly?
5 credits flat plus 0.1 credits per listing to build, then 0.05 credits per listing per refresh cycle. A 100-listing directory: 15 credits to build, 5 per refresh. The wizard shows your exact number before you confirm, and you are charged on the count actually found, not the cap. If your account has a first-build discount, the wizard shows it on the cost bar.
Do I need to buy the domain before building?
No. The site launches on a free pages.dev address, and search engines are blocked there on purpose. Buy the domain whenever you like and connect it from Settings after the first build; the site republishes as indexable on its own.
Can I choose which businesses appear?
The line-up is earned: the scan finds the businesses, and the published scoring methodology ranks them. You cannot hand-pick who makes a best-of list, and that is the point; a ranking that is for sale is worth nothing. What you can do is hide any listing from the site, edit any page’s text and SEO fields, and correct factual details.
Why does a location page say 90 providers serve the area but list far fewer?
On service-area directories, each location page reports three different numbers on purpose. “Providers serving” counts every business that covers the area, whether based there or reaching it from nearby. “Based in” counts businesses physically located in that area, often just a handful.
The ranked cards are the top slice of the serving pool: locally based providers first, then the nearest and highest-scored of the rest, capped at 12 on full pages and 6 on lean ones.
The cap is deliberate. If every location page listed the whole metro pool, neighbouring pages would be near-duplicates of each other, which reads as doorway spam to Google. The trimmed, proximity-weighted list keeps each page genuinely different.
How does featured placement work, and where does it show?
Featured is a labelled paid slot, and it never changes anyone’s earned rank. A featured business gets a sponsored strip above the results on its category pages and the browse page, a spot in the homepage featured section, and a highlighted pin on the map, always marked as sponsored. The strip stays pinned even when visitors filter or search the list.
The earned ranking underneath is complete and unaffected, which is what keeps your directory credible enough to sell placement on in the first place. When a featured term expires, the placement drops off all surfaces on the next publish.
What if the scan finds fewer businesses than my cap?
You pay for what it found. The cap is a ceiling for the scrape, not a commitment. If the estimate billed on a higher count than the build delivered, the difference comes back as a refund.
Can I change the name, design, or publisher later?
Yes, all of it. Design, publisher details, logos, the name, and every page’s content and SEO fields are editable from the dashboard and go live on the next publish.
The name is still the field worth getting right up front: it feeds your page titles, structured data, and branding, so a later rename is a real brand change. The branding guide is the pre-read for that.
Can I build a directory in another language?
Not yet. Directories generate in English only for now, so pick a niche and city where buyers search in English. This is narrower than the main site builder, which supports 10 languages; directory language support has not caught up yet.
What does the monthly refresh actually do?
It re-runs discovery and re-checks every listing: closed businesses drop out, new ones enter, sentiment is re-analyzed where the reviews materially changed, and every page is re-stamped with a real date. It is also when new buyer guides land. You can set the cadence to weekly in the wizard or the settings if your niche moves fast.
From a niche and a city to a live directory
The wizard takes about ten minutes of input; the build takes 15 to 30 minutes of nothing. You see the exact credit cost before you confirm.
Everything is editable later from the dashboard, the name included, so nothing here locks you in. The name still feeds your branding and titles, so get it close first.
Create a directory